Recycled Art- Creating on a budget

Creating on a budget is a lot easier than it seems. If you are anything like me, you try to save as much money as possible. Especially when buying supplies and household items. I want to share with you some ways that I create art without having to dig deep into the pocketbook. While, yes, it is easier and faster to just buy new all the time, it’s not always the most cost effective plan.
I think my “penny-pinching” started with growing up in a home with limited income. My family was never rich in funds, but we were rich in creative solutions to problems. When something would break down, my parents would network with the neighbors to figure out a fix. When the holidays would come around, it was common to receive handmade gifts instead of popular store bought items. My favorite gift growing up was a shelf that my Grandpa Jerry made for me. It was shaped like a unicorn for me to put my figurines on.
Saving on paper crafts
All year long, my mom would save the cards friends and family would mail to her. She also saved magazines and wrapping paper, gift bags, packing material. My mom taught me early on how to make cards. We would take an old christmas card and trim off the back. After that we would glue it to plain cardstock and add other embellishments.
Another way she saved money on holiday cards was checking the thrift stores for their arts and crafts area. A brand new rubber stamp for card making can be well over 20 dollars. But you can find them for under a dollar at thrift stores on occasion. A package of invitation cards with envelopes can also be upcycled by gluing the cute holiday image to the front.
Creating on a budget is also easy with auctions. In the summertime we would check the newspaper for auction listings and go to the nearby ones that looked interesting. Sometimes we wouldn’t get anything. But other auctions there would be a section of items that didn’t sell. Those were free for the taking after the auction finished up.
Saving on jewelry
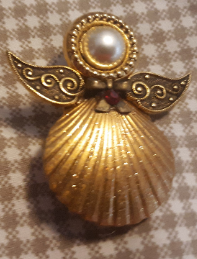
Broken jewelry lots were one of my mom’s favorite auction finds. It was easy for her to take them apart, clean them, and then make something new. She made a lot of angel brooches this way, and I loved helping her with them. Eventually I started creating them on my own, the same way that she did.

The photo above is one of the brooches I created using broken jewelry. The head is an earring that lost the post. Her wings were from a bracelet. The bow, shell and rhinestone were also originally earrings. I painted the shell with a glitter nail polish to make it sparkle. The pin back on it was the only “new” item purchased to finish the brooch off.
Where is the biggest expense?
I think one of the biggest crafting expenses is the tools- pliers, wire cutters, scissors, paper cutters, kilns, etc. Finding inexpensive sources for tools can be a challenge.
Occasionally you can rent the larger power tools from certain companies. I like this option to see if it’s something I want to invest time and energy into instead of buying. It’s frustrating finding out the project was a lot harder than I expected. Or worse, not something as enjoyable as I thought it would be.
Make sure to always check thrift stores, auctions, and facebook marketplace for deals. Creating on a budget is also easier with help from friends and family. Look into bartering and trading!


